Securing your webservice

Why Web service security if standards like SSL/TLS exists?

  • End-to-end security: Consider an online credit card payment scenario which involves three parties: a cardholder (that’s you), an online merchant, and your bank. Ideally, all parties should be authenticated to one another, and the secure communication path should stretch from the cardholder all the way to the bank. But SSL/TLS is simply not designed for such a scenario; SSL/TLS only handles point-to-point security. Thus, if you rely only on SSL, you cannot send your credit card number to the bank through the merchant without the merchant knowing it. The same goes for Web services, although at a slightly different level. Web service application topologies include all sorts of devices, PCs, proxies, demilitarized zones, gateways, and who knows what else. Consequently, many intermediaries come between two communicating parties. SSL/TLS may secure the path between any two, but not from one end to the other. Something new, therefore, must address this problem.
  • Selective encryption: In an online payment scenario, in practice, many messages travel to and fro among the three parties before the payment itself happens, but conceptually, what happens proves simple: a message travels from the consumer to the merchant to the bank. Such a message may contain two things: information about the goods bought and instructions for the bank to pay the merchant. The bank doesn’t need to know about the former, and the merchant doesn’t need to know about the latter. The message, therefore, must be partitioned in such a way that a merchant cannot see the bank’s part of the message, and vice versa. This is difficult to achieve; it’s impossible with S/MIME or PGP because these standards will encrypt the entire XML document. XML Encryption’s selective encryption feature, in contrast, allows an XML-based solution for such problems.

Web service Security:

  • Authentication: Authentication is used to ensure that parties within a business transaction are really who they claim to be; thus proof of identity is required. This proof can be claimed in various ways. One simple example is by presenting a user ID along with a secret password. A more complex example is one that uses an X.509 certificate issued from a trusted Certificate Authority (such as Verisign). The certificate contains identity credentials and has a pair of private and public keys associated with it. The proof of identity presented by a party includes the certificate itself and a separate piece of information that is digitally signed using the certificate’s private key. By validating the signed information using the public key associated with the party’s certificate, the receiver can authenticate the sender as being the owner of the certificate, thereby validating their identity. When both parties authenticate each other, this is called mutual authentication and is often done between a web service consumer and a web service provider.
  • Data Integrity:  In order to validate the integrity of business information exchanged in a transaction ensuring that a message’s content has not been altered or corrupted during its transmission over the Internet, the data can be digitally signed using security keys. This is the second requirement of the security triad. A common practice is to use the private key of the sender’s X.509 certificate to digitally sign the SOAP body of a web service request. Similarly, SOAP header blocks in a request can also be signed to ensure the integrity of information exchanged in a transaction that is outside the scope of the actual business context (for example, message IDs, security tokens). Likewise, a web services response can be digitally signed to ensure data integrity.
  • Data Confidentiality: Encryption technology can be used to make the information exchanged in web services requests and responses unreadable. The purpose is to ensure that anyone accessing the data in transit, in memory, or after it has been persisted, would need the appropriate algorithms and security keys to decrypt the data before being able to access the actual information.

Web service Security model:

The public key of the Service Provider’s X.509 certificate must be exchanged with the client and configured into the client’s runtime prior to invoking the Service Provider’s services. For both the Consuming Application and the Service Provider, the root certificate of the Certificate Authority (such as Verisign) that issued the parties’ certificates will need to be imported into the local keystores. The Consuming Application’s keystore will have the root certificate of the Service Provider’s certificate. Likewise, the Service Provider’s keystore will require the root certificate of the Consuming Application’s certificate. This is mandatory and allows validation of the digital signatures of the individual certificates that are passed as binary security tokens in the SOAP messages.

A full implementation of all three security requirements would include:

  • The senders of the web services request or response
    • Signing the message with the private key of their X.509 certificate
    • Encrypting the message with the public key of the receiver’s X.509 certificate to ensure that only they can access the message content
  • The receivers of the web services request or response
    • Verifying the signature of the message using the public key of sender to authenticate the sender and to verify integrity of the message
    • Decrypting the message with the private key of their X.509 certificate

Web service Security use case:

1.     Consuming Application processing of web services request

Typically, the Consuming Application will have a Service Proxy or a JAX-RPC stub component that has been generated from an Integrated Development Environment (such as WebSphere Studio Application Developer) using the Service Provider’s WSDL. When a web services invocation is made, the proxy or SOAP runtime on the client system performs the WS-Security functions prior to sending the request.

  • First, the SOAP message is digitally signed. The SOAP runtime may access a keystore to retrieve security keys and certificates as needed. Depending on the WS-Security support your environment provides, you might be able to sign just the SOAP body, or you might be able to sign individual elements within the body.
  • In addition, SOAP header blocks might be signed. The signature is performed using the private key of the Consuming Application’s X.509 certificate. Once the message has been signed, the X.509 certificate itself is included in the SOAP header as a binary security token.
  • The message is encrypted using a symmetric algorithm with a shared key. The key used for the data encryption is encrypted itself using an asymmetric algorithm with the public key associated with the Service Provider’s X.509 certificate. Once the message and shared key have been encrypted, a reference to the X.509 certificate of the Service Provider to whom the request is being sent is included in the SOAP header. This is done because the Service Provider might be using multiple certificates.

2.     Service Provider processing of web services request

When a Service Provider receives a web services request, the request is directed to the SOAP processing engine (SOAP runtime) based on the request’s URL (published access point for the service).

  • The message data and shared key passed in the request are encrypted, so the first step is to identify the X.509 certificate referenced in the SOAP header and retrieve its private key from a keystore. Once the private key is obtained, the shared key can be decrypted using an asymmetric algorithm. With the shared key in the open, the message data can be decrypted using a symmetric algorithm.
  • With the entire message now in the open, the X.509 certificate passed in the SOAP header can be accessed to retrieve its public key. The message’s digital signature is performed with the Consuming Application’s public key. As a result of the the signature’s successful validation, the Service Provider SOAP runtime not only validates the message integrity but also is ensured that the Consuming Application actually signed the message. This process also authenticates the message’s origin/sender because only the sender who owns the certificate has access to the private key used to sign the message. Once the message has been decrypted and the signature validates the SOAP runtime calls the web services implementation.

3.     Service Provider processing of web services response

Once the business logic of the service implementation has executed and a response is available, the same WS-Security operations take place for the web services response message. However, the roles of X.509 key pairs are reversed for digital signature and encryption. The Service Provider’s SOAP runtime digitally signs the message using the private key of its own X.509 certificate. The certificate is included in the SOAP message, and the message is encrypted using a shared key. The key used for the data encryption could be the same key passed in the original request or another randomly generated key, the latter being more typical. The encryption of the shared key is performed using the public key of the certificate that was passed in the request; thus only the sender of the request who has access to the certificate’s private key is the only party that can decrypt the message. Once the message has been signed and encrypted, the Service Provider’s SOAP runtime sends the response to the Consuming Application.

4.     Consuming Application processing of web services response

The Consuming Application’s WS-Security processing of the web services response is very similar to what the Service provider for the request performed.

The Consuming Application receives a web services response with the response directed to the SOAP processing engine (SOAP runtime) based on the original HTTP session. The message data and shared key passed in the response are encrypted. Therefore, the initial step is to retrieve the private key of the certificate associated with the corresponding request to decrypt the shared key using an asymmetric algorithm. With the shared key in the open, the message data can be decrypted using a symmetric algorithm. After the entire message is in the open, the X.509 certificate passed in the SOAP header can be accessed to retrieve its public key. The response message’s digital signature is performed with the Service Provider’s public key. Following the signature’s successful validation, the Consuming Application’s SOAP runtime not only validates the message integrity, but also is ensured that the Service Provider actually signed the message. This process also authenticates the message’s origin/sender because only the sender who owns the certificate has access to the private key used to sign the message. Once the message has been decrypted and the signature validated, the SOAP runtime forwards the response to the Consuming Application.

Cafe Babe ;)


Not sure if anyone of you has tried opening a java .class file using some hex editor. If you haven’t yet, try it once!


The first thing that you will notice on doing so, is it’s very first 4 byte header “CAFE BABE” 😉

Every java class files are identified by 4 byte header (in hex) CA FE BA BE (first 4 entries). This signature is just an easy way of verifying that a block of data really does claim to be an instance of the Java class format. Every Java binary class, even one that isn’t present on the file system, needs to start with these four bytes.


The history of this magic number was explained by James Gosling:-


“We used to go to lunch at a place called St Michael’s Alley. According to local legend, in the deep dark past, the Grateful Dead used to perform there before they made it big. It was a pretty funky place that was definitely a Grateful Dead Kinda Place. When Jerry died, they even put up a little Buddhist-esque shrine. When we used to go there, we referred to the place as Cafe Dead. Somewhere along the line it was noticed that this was a HEX number. I was re-vamping some file format code and needed a couple of magic numbers: one for the persistent object file, and one for classes. I used CAFEDEAD for the object file format, and in grepping for 4 character hex words that fit after “CAFE” (it seemed to be a good theme) I hit on BABE and decided to use it. At that time, it didn’t seem terribly important or destined to go anywhere but the trash-can of history. So CAFEBABE became the class file format, and CAFEDEAD was the persistent object format. But the persistent object facility went away, and along with it went the use of CAFEDEAD – it was eventually replaced by RMI.”


Overcoming Runtime.exec havoc with JNA

Issue: 

Think of a situation where your java application wants to change the owner & permission of a unix file programmatically. With JRE1.5, the obvious way to achieve this could be the usage of Runtime.exec.  With Unix as runtime, this invokes fork() which makes a complete copy of entire parent process’s address space and exec() then turns that copy to a new process. The disadvantage of this approach is that you will end up with Out Of Memory issues without a good reason.

Solution:

Use Java Native Access to invoke native C POSSIX library!

JNA allows you to call directly into native functions using natural Java method invocation. The Java call looks just like it does in native code. The JNA library uses a small native library stub to dynamically invoke native code. The developer uses a Java interface to describe functions and structures in the target native library. This makes it quite easy to take advantage of native platform features without incurring the high overhead of configuring and building JNI code for multiple platforms.

Below is a java code snippet which changes owner and permission of a unix file without using Runtime.exec. You need to place jna.jar and platform.jar in your classpath for compiling and running this application :-


import com.sun.jna.Library;
import com.sun.jna.Native;

public class FilePermOwnerChange {
public interface POSIX extends Library {
public int chmod(String filename, int mode);
public int chown(String filename, int userId, int groupId);
}

  public static void main(String[] args) {
       POSIX posix = (POSIX) Native.loadLibrary("c", POSIX.class);
       posix.chmod("/tmp/BufCre.txt", 0664); //0664 is just an example
       posix.chown("/tmp/BufCre.txt", 1000, 1000); // 1000 is just an example. Give the UID and GID respectively for the new owner of this file.
  }
}

Making JVM to ignore serialVersionUIDs mismatch

Issue:

If a serializable class does not explicitly declare a serialVersionUID, then the serialization runtime will calculate a default serialVersionUID value for that class which is highly sensitive to the class details and may vary depending on compiler implementations, and can thus result in unexpected InvalidClassExceptions during deserialization. So,  if an older version of a serializable class doesn’t explicitly mention a serialVersionUID then deserialization of that object may fail even though the actual class definition matches.  In such a scenario we just want JVM to ignore differences in these serialVersionUIDs and not throw any exception in case they mismatch!

Solution:

Extend from ObjectInputStream class and override readClassDescriptor() to add logic which compares serialVersionUID of the class in local JVM and serialVersionUID of the stream descriptor and if they vary, then assign localClassDescriptor to the stream descriptor. Then wherever we are creating objects of ObjectInputStream, we use CustomInputStream instead and it deserializes the old object with new serialVersionUID.

import java.io.IOException;
import java.io.InputStream;
import java.io.InvalidClassException;
import java.io.ObjectInputStream;
import java.io.ObjectStreamClass;
import org.slf4j.Logger;
import org.slf4j.LoggerFactory;

public class CustomInputStream extends ObjectInputStream {

    private static Logger logger = LoggerFactory.getLogger(CustomInputStream.class);

    public CustomInputStream(InputStream in) throws IOException {
        super(in);
    }

    protected ObjectStreamClass readClassDescriptor() throws IOException, ClassNotFoundException {
        ObjectStreamClass resultClassDescriptor = super.readClassDescriptor(); // initially streams descriptor
        Class localClass; // the class in the local JVM that this descriptor represents.
        try {
            localClass = Class.forName(resultClassDescriptor.getName());
        } catch (ClassNotFoundException e) {
            logger.error("No local class for " + resultClassDescriptor.getName(), e);
            return resultClassDescriptor;
        }
        ObjectStreamClass localClassDescriptor = ObjectStreamClass.lookup(localClass);
        if (localClassDescriptor != null) { // only if class implements serializable
            final long localSUID = localClassDescriptor.getSerialVersionUID();
            final long streamSUID = resultClassDescriptor.getSerialVersionUID();
            if (streamSUID != localSUID) { // check for serialVersionUID mismatch.
                final StringBuffer s = new StringBuffer("Overriding serialized class version mismatch: ");
                s.append("local serialVersionUID = ").append(localSUID);
                s.append(" stream serialVersionUID = ").append(streamSUID);
                Exception e = new InvalidClassException(s.toString());
                logger.error("Potentially Fatal Deserialization Operation.", e);
                resultClassDescriptor = localClassDescriptor; // Use local class descriptor for deserialization
            }
        }
        return resultClassDescriptor;
    }
}


Dynamic Schema Creation In Hibernate

Scenario:

In real time,  you may need to generate database schema dynamically.

One solution to achieve this is with the usage of Hibernate as the provider for connecting to db.  The DB schema details are provided in a configuration file and can easily be modified based on the requirement. There is absolutely no need to write entity classes here. Those will be auto-generated!

Steps:

1. Add the following two additional lines to your hibernate.cfg.xml file:

<property name="default_entity_mode">dynamic-map</property>
<mapping resource="test.hbm.xml"/>

“test.hbm.xml” file is my mapping xml file where i mention the db schema details to be dynamically generated.

Setting the property “default_entity_mode” to “dynamic-map” tells hibernate to generate the schema dynamically by reading the mapping file. No entity classes are needed here!

2. Below is my sample mapping file (test.hbm.xml)

<?xml version="1.0"?>
<!DOCTYPE hibernate-mapping PUBLIC
"-//Hibernate/Hibernate Mapping DTD//EN"
"http://hibernate.sourceforge.net/hibernate-mapping-3.0.dtd">

<hibernate-mapping>
<class  entity-name="Student" table="Student">
<id name="id" column="STUDENT_ID" type="long">
<generator/>
</id>
<property  name="name" type= "string"  column="STUDENT_NAME"/>
<property name="lastName" type="string" column="STUDENT_LAST_NAME" />
</class>
</hibernate-mapping>

3. In my servlet’s init(), i  build
hibernate session factory which will create
the database dynamically. I call this servlet from the browser using the URL
http://<server&gt;:8080/HibernateDynaMap-1.0/entity” which invokes it’s init().

A lightweight alternative to DB Visualizer and Oracle JDeveloper

Its been a while, i’m using hsqdb. Its simple, its light weight and it’s in-memory!

I thought I knew everything about it until I learnt today that it’s distribution has many tools to offer which are quite useful!

I’ll discuss one of such useful tool:

  • DatabaseManagerSwing

“DatabaseManagerSwing” tool is useful for connecting to almost all available DBs in the market (Oracle, DB2, MySQL, Informix, Pointbase, Postgresql, ofcourse hsqldb).

It’s very simple and an easy alternative of  heavy weight db client applications like DB Visualizer and Oracle JDeveloper. If you just intent to connect to DB and run some SQL commands and see results then this tool is definitely a very good alternative, especially when your PC’s performance already sucks!

You can download hsqldb here.

I’ll try to demo the usage of this tool by connecting to my “MySQL DB instance” called “webchat”.

  • Ofcourse, 1st step is to start your MySQL database server instance.
  • Download myql jdbc driver jar from here.
  • Copy the above jar to “”%HSQLDB_INSTALL_DIR%/lib” folder.
  • Go to “%HSQLDB_INSTALL_DIR” & Start “DatabaseManagerSwing” tool using the below command: java -cp lib/hsqldb.jar;lib/mysql-connector-java-5.0.8-bin.jar org.hsqldb.util.DatabaseManagerSwing
  • Below window opens up: 
  • Now enter the settings as below: (Remember my DB instance name is webchat and my db instance is running in localhost). Click OK.
  • Now the tool should connect to MySQL DB as below:

Apart from native LAF, there is also a Java and motif LAF of this tool as shown below:

Configuring MySQL in glassfish

Application Server Version: GlassFish Server Open Source Edition 3.1.1 (build 12)

Steps:

1. Download mysql JDBC driver here.

2. Extract the zip and copy the “mysql-connector-java-5.1.17-bin” jar to “%GLASSFISH_INSTAL_DIR%/lib” folder.

3. Re-start glassfish server.

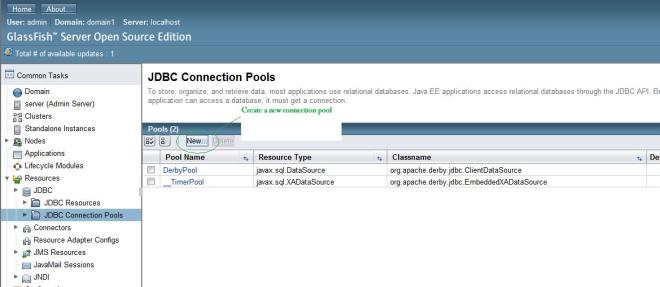
4. Then create JDBC connection pool.

5.

6.

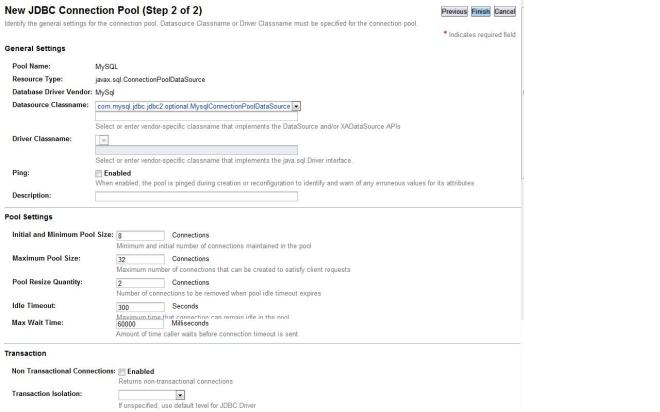
7.  Fill in atleast the below details in the property table.

  • DatabaseName (e.g. webchat)
  • Password (e.g. root)
  • URL (e.g. jdbc:mysql://localhost:3306/webchat)
  • Url (e.g. jdbc:mysql://localhost:3306/webchat)
  • ServerName (e.g. localhost)
  • User (e.g. root)

8. After the Step 7 is completed, the configuration of connection pool is done. After this “MySQL” should show as below:

9. Test the connectivity by clicking ping. Below snippet shows a successful connection :

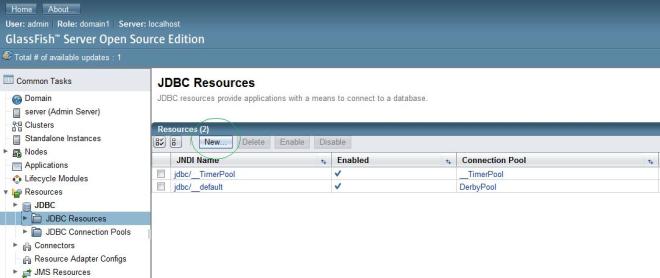
10. Next step is to create a JNDI binding for this connection.

11.

12. With completion of this step, MySQL connection is bound with JNDI name “jdbc/mysqlwebchat”.

man, this was awesome ;-)

A guy (Pablo Fernandez) put this query in stack overflow:

 ————–clip————-

Hi, I’m looking for a Java library that helps me building an OAuth Provider. I must be able to receive OAuth signed requests and determine whether they are valid or not (checking the signature, timestamp and nonce values).

Do you know if there’s something out there that makes this task easier?

thanks a ton!

————–clap————-


Below were the responses for the above query. Read these responses from top to bottom, I’m sure you will be as excited as I was when I did 😉

———–clip————–

 Comment 1:

In other words, what you r are looking for is a Java library that realizes an OAuth provider, not consumer. You may want to edit your question to correct that. – Matthias Mar 21 ’10 at 10:59


 Comment 2:

Pablo, please change your question title and your question to reflect the intention. You want a OAuth Provider… – Hendy Irawan Dec 22 ’10 at 18:50


 Comment 3:

I was JUST about to link you to Scribe (github.com/fernandezpablo85/scribe-java) when I noticed that you’re its author! Did you actually end up writing the library yourself ? 😉 – Hendy Irawan Dec 23 ’10 at 8:26


 Comment 4:

@Hendy I had to write a client library (scribe) because all other sucked. I didn’t need to write the server side stuff (provider). Maybe if there is enough need sometime I’ll do some “scribe-server” thing. Thanks – Pablo Fernandez Dec 23 ’10 at 14:38

———–clap————–

Comment 3 was jus awesome 😉

Courtesy: http://stackoverflow.com/questions/1731966/library-for-oauth-provider-java

Configuring JBoss server adapter for version > 5.0 in eclipse

Issue:


Resolution:

Download the JBoss AS Tool in eclipse using the below mentioned update site.

http://download.jboss.org/jbosstools/updates/development/indigo/ 

After succesful installation of the above tool, you can now configure all the versions of JBoss in your eclipse workbench.

Configuring tomcat deployment context xml location in Netbeans

Issue:

When generating a URL to deploy the application on Tomcat, NetBeans
does not escape special characters, which causes Tomcat to mis-interpret them, thus causing deployment to fail.

Solution:

Instead of default “C:\Documents and Settings\sanjith\Local Settings\Temp” directory location of deployment context.xml file,  use simple location (without spaces or any special characters) like D:\temp.

Note: Changing of the windows environment variable “TEMP” will not help here!

Instead add the following in “netbeans.conf” file under the “etc” directory of netbean’s installation home directory to resolve this problem.


-J-Djava.io.tmpdir="D:\temp"