GoLang Fundamentals
Structuring your Go Application
When we are learning Go, we tend to do it just in a single file thinking of it at a very small scale. But in practice, when we are building production quality stuffs, the first thing we’ve to start doing it is making multiple files, organizing them in folders. So, its the first thing we do, but its the last thing we ever talk about.
The structure of a program is all about – How can you quickly go to the place you need in order to work on the thing you need to work on? Good structures, good file names, good folder names – this stuff all helps with that process.
From Go language, there are some constraints like how you create folders because everything inside a folder is grouped logically as a package. Nested folders don’t really do anything special in Go as they don’t represent nested packages or anything.
One of the way could be to just start with one flat structure, and then later, once there are more code then you try separating those. So, let the structure emerge from the work you are doing, rather than trying to imagine it upfront.
Go Dev Setup
Go Introduction
Original motivation for the language
Everything happens for a reason…
As quoted in one of a talk – Rob Pike, co-author of the language, was working with Google where most of the server software were written in C++. He was frustrated working with C++ programs as every time he touched anything, he had to wait for 45 minutes for getting an another build. Apart from this huge build time, the usage of threads for solving concurrent problems were restricted for him because C++ libraries didn’t work properly. So, he had to do lots of workarounds to get things right for a very simple job. These all motivated the idea to work on something new to solve this!
Chain of responsibility
Motivation :-
The idea of this pattern is to decouple senders and receivers by giving multiple objects a chance to handle a request. The request gets passed along a chain of objects until one of them handles it. The first object in the chain receives the request and either handles it or forwards it to the next candidate on the chain, which does likewise. The object that made the request has no explicit knowledge of who will handle it.

When you should use this :-
This pattern is recommended when either of the following scenarios occur in your application –
1. You want to issue a request to one of several objects without specifying the receiver explicitly.
2. Multiple objects can handle a request. The handler should be ascertained in the runtime automatically.
3. A request not being handled is an acceptable outcome.
Practical usage of the pattern –
1. The pattern is used in windows systems to handle events generated from the keyboard or mouse.
2. Exception handling systems also implement this pattern, with the runtime checking if a handler is provided for the exception through the call stack. If no handler is defined, the exception will cause a crash in the program, as it is unhandled.
3. In JavaEE, the concept of Servlet filters implement the Chain of Responsibility pattern, and may also decorate the request to add extra information before the request is handled by a servlet.
Sample Code :-

Abstract rule handler –
package com.sanjit;

import java.util.Map;

import com.sanjit.rule.Rule;

/**
 * Abstract rule handler class.
 *
 * @author Sanjit Mohanty
 * @version 0.1
 *
 *
 * Revision History:
 * VERSION DATE AUTHOR COMMENT
 * 0.1 20-May-2015 Sanjit Mohanty initial create
 *
 *
 */

public abstract class RuleHandler {
protected RuleHandler nextRuleHandler;

public RuleHandler() {
nextRuleHandler = null;
}

public void setNextRuleHandler(RuleHandler nextRuleHandler) {
this.nextRuleHandler = nextRuleHandler;
}

protected abstract boolean canHandle(Rule rule);
protected abstract Map processRule(Rule rule);

public Map populateRuleData(Rule rule) {

Map result;

if (canHandle(rule)) {
result = processRule(rule);
} else {
if (null != nextRuleHandler) {
result = nextRuleHandler.populateRuleData(rule);
} else {
result = new UnknownRuleHandler().process(rule);
}
}
return result;
}

}
First concrete rule handler –
package com.sanjit;

import java.util.HashMap;
import java.util.Map;

import com.sanjit.rule.Rule;

/**
 * Concrete rule handler 1 class.
 *
 * @author Sanjit Mohanty
 * @version 0.1
 *
 *
 * Revision History:
 * VERSION DATE AUTHOR COMMENT
 * 0.1 20-May-2015 Sanjit Mohanty initial create
 *
 *
 */
public class ConcreteRuleHandler1 extends RuleHandler {

@Override
protected Map process(Rule rule){
 Map ruleData = new HashMap();

 // Your processing logic goes here...
 return ruleData;
 }

 @Override
 protected boolean canHandle(Rule rule) {
 // TODO Auto-generated method stub
 return (rule instanceof ConcreteRuleHandler1);
 }
}
Second concrete rule handler –
package com.sanjit;

/**
 * Concrete rule handler 2 class.
 *
 * @author Sanjit Mohanty
 * @version 0.1
 *
 *
 * Revision History:
 * VERSION DATE AUTHOR COMMENT
 * 0.1 20-May-2015 Sanjit Mohanty initial create
 *
 *
 */
public class ConcreteRuleHandler2 extends RuleHandler {

@Override
protected Map process(Rule rule){
 Map ruleData = new HashMap();

 // Your processing logic goes here...
 return ruleData;
 }

 @Override
 protected boolean canHandle(Rule rule) {
 // TODO Auto-generated method stub
 return (rule instanceof ConcreteRuleHandler2);
 }
}
Third concrete rule handler –
package com.sanjit;

/**
 * Concrete rule handler 3 class.
 *
 * @author Sanjit Mohanty
 * @version 0.1
 *
 *
 * Revision History:
 * VERSION DATE AUTHOR COMMENT
 * 0.1 20-May-2015 Sanjit Mohanty initial create
 *
 *
 */
public class ConcreteRuleHandler3 extends RuleHandler {

@Override
protected Map process(Rule rule){
 Map ruleData = new HashMap();

 // Your processing logic goes here...
 return ruleData;
 }

 @Override
 protected boolean canHandle(Rule rule) {
 // TODO Auto-generated method stub
 return (rule instanceof ConcreteRuleHandler3);
 }
}
Client class –
package com.sanjit;

import java.util.Map;
import com.sanjit.rule.Rule;

/**
 * Client class.
 *
 * @author Sanjit Mohanty
 * @version 0.1
 *
 *
 * Revision History:
 * VERSION DATE AUTHOR COMMENT
 * 0.1 20-May-2015 Sanjit Mohanty initial create
 *
 *
 */

public class RuleClient {

private ConcreteRuleHandler1 concreteRuleHandler1 = null;
private ConcreteRuleHandler2 concreteRuleHandler2 = null;
private ConcreteRuleHandler3 concreteRuleHandler3 = null;

public RuleClient () {
super();

 // TODO Auto-generated constructor stub
concreteRuleHandler1 = new ConcreteRuleHandler1();
concreteRuleHandler2 = new ConcreteRuleHandler2();
concreteRuleHandler3 = new ConcreteRuleHandler3();

concreteRuleHandler1.setNextRuleHandler(concreteRuleHandler2);
concreteRuleHandler2.setNextRuleHandler(concreteRuleHandler3);
}

 private void populateRuleSpecificValues(Rule rule) {
 Map ruleData = null;

 RuleHandler ruleHandler = concreteRuleHandler1;
ruleData = ruleHandler.populateRuleData(rule);
 }
}
Data Driven Testing – Decoupling test data from test logic
Data-driven testing (DDT) is a term used in the testing of computer software to describe testing done using a table of conditions directly as test inputs and verifiable outputs as well as the process where test environment settings and control are not hard-coded. In the simplest form the tester supplies the inputs from a row in the table and expects the outputs which occur in the same row. The table typically contains values which correspond to boundary or partition input spaces. In the control methodology, test configuration is “read” from a database.
Anything that has a potential to change is separated out from the test logic and moved into an ‘external asset’. This can be a configuration or test dataset. The logic executed in the script is dictated by the data values. The script is simply a “driver” for the data that is held in the data source.
To convey the concept, I’ve created a sample project using TestNG. Pl. note implementation minimized for brevity. You will need following jars in your class path to successfully execute the project:
- poi-3.12-beta1-20150228.jar
- poi-ooxml-3.12-beta1-20150228.jar
- testng-6.8.21.jar
- xmlbeans-2.6.0.jar
The above were the versions which I had used for the demonstration. You could use the latest version of the above jars.
I’ve put the test data & expected outcome in an excel called TestData.xls and in my test case I refer it. The excel has multiple sheets which holds data for each test case type.
Below is the source code under test –
package com.sanjit;

/**
 * A simple minimal calculator. Implementation minmized for brevity.
 *
 * @author Sanjit Mohanty
 * @version 0.1
 *
 *
 * Revision History:
 * VERSION DATE AUTHOR COMMENT
 * 0.1 23-Apr-2015 Sanjit Mohanty initial create
 *
 *
 */

public class Calculator {

 public Calculator(){
 }

 public Double sum(Double obj1, Double obj2){
 return obj1+obj2;
 }

 public Double diff(Double obj1, Double obj2){
 return obj1-obj2;
 }

 public Double mul(Double obj1, Double obj2){
 return obj1*obj2;
 }

 public Double div(Double obj1, Double obj2){
 return obj1/obj2;
 }
}
Below is the unit test source code for the above class. Here we refer the excel for input data as well as for the expected outcome. No test data is mentioned here. The same test source runs for different inputs.
</pre>
<pre>package com.sanjit.test;

import java.lang.reflect.Method;

import org.testng.Assert;
import org.testng.annotations.BeforeMethod;
import org.testng.annotations.DataProvider;
import org.testng.annotations.Test;

import com.sanjit.Calculator;
import com.sanjit.test.util.DataTypeParameter;
import com.sanjit.test.util.ExcelUtils;

/**
 * Test class for
 * {@link com.sanjit.Calculator}
 *
 * A simple example of Data Driven Testing!
 * Test data has been externalized to an excel and is being fed to the test case through TestNG's dataprovider.
 *
 * @author Sanjit Mohanty
 * @version 0.1
 *
 *
 * Revision History:
 * VERSION DATE AUTHOR COMMENT
 * 0.1 23-Apr-2015 Sanjit Mohanty initial create
 *
 *
 */

public class CalculatorTest {
 private Calculator calculator;

 @BeforeMethod
 public void initialize() {
 calculator = new Calculator();
 }

 /*
 * Data Provider feeding test data from an excel with multiple sheets for different test cases
 */
 @DataProvider(name = "testData")
 public Object[][] testData(final Method testMethod) throws Exception {
 DataTypeParameter parameters = testMethod
 .getAnnotation(DataTypeParameter.class);

 Object[][] testObjArray = ExcelUtils
 .getTableArray(
 "D://test//data//TestData.xls",
 parameters.testType()); // Edit the test data excel location accordingly

 return (testObjArray);

 }

 /*
 * Sum Test Case
 */
 @Test(dataProvider = "testData")
 @DataTypeParameter(testType = "SumTest")
 public void testSumChecker(String inputNumber1, String inputNumber2,
 String expectedResult) {
 Assert.assertEquals(
 Double.valueOf(expectedResult),
 calculator.sum(Double.valueOf(inputNumber1),
 Double.valueOf(inputNumber2)));
 }

 /*
 * Difference Test Case
 */
 @Test(dataProvider = "testData")
 @DataTypeParameter(testType = "DiffTest")
 public void testSubChecker(String inputNumber1, String inputNumber2,
 String expectedResult) {
 Assert.assertEquals(
 Double.valueOf(expectedResult),
 calculator.diff(Double.valueOf(inputNumber1),
 Double.valueOf(inputNumber2)));
 }

 /*
 * Multiplication Test Case
 */
 @Test(dataProvider = "testData")
 @DataTypeParameter(testType = "MulTest")
 public void testMulChecker(String inputNumber1, String inputNumber2,
 String expectedResult) {
 Assert.assertEquals(
 Double.valueOf(expectedResult),
 calculator.mul(Double.valueOf(inputNumber1),
 Double.valueOf(inputNumber2)));
 }

 /*
 * Division Test Case
 */
 @Test(dataProvider = "testData")
 @DataTypeParameter(testType = "DivTest")
 public void testDivChecker(String inputNumber1, String inputNumber2,
 String expectedResult) {
 Assert.assertEquals(
 Double.valueOf(expectedResult),
 calculator.div(Double.valueOf(inputNumber1),
 Double.valueOf(inputNumber2)));
 }
}
Below I’ve created a custom annotation to inject parameter into the TestNG data provider. In my case this annotation holds the test case type like SumTest, DiffTest, MulTest etc. Based on the test case type, the corresponding sheet in the excel is parsed by the test source code for the test run.
</pre>
<pre>package com.sanjit.test.util;

import java.lang.annotation.Retention;
import java.lang.annotation.Target;
import java.lang.annotation.ElementType;
import java.lang.annotation.RetentionPolicy;

/**
 * Custom annotation for parameter passing to the data provider.
 *
 * @author Sanjit Mohanty
 * @version 0.1
 *
 *
 * Revision History:
 * VERSION DATE AUTHOR COMMENT
 * 0.1 23-Apr-2015 Sanjit Mohanty initial create
 *
 *
 */

@Target(ElementType.METHOD)
@Retention(RetentionPolicy.RUNTIME)
public @interface DataTypeParameter {
 String testType();
}
Below is a utility class for reading the excel sheet which has our test data as well as the expected outcome.
<pre>package com.sanjit.test.util;

import java.io.FileInputStream;
import java.io.FileNotFoundException;
import java.io.IOException;
import org.apache.poi.ss.usermodel.WorkbookFactory;

/**
 * Excel parsing utility class
 *
 * @author Sanjit Mohanty
 * @version 0.1
 *
 *
 * Revision History:
 * VERSION DATE AUTHOR COMMENT
 * 0.1 23-Apr-2015 Sanjit Mohanty initial create
 *
 *
 */

public class ExcelUtils {

 private static org.apache.poi.ss.usermodel.Workbook ExcelWBook;
 private static org.apache.poi.ss.usermodel.Sheet ExcelWSheet;

 private static org.apache.poi.ss.usermodel.Cell Cell;
 private static org.apache.poi.ss.usermodel.Row Row;

 public static Object[][] getTableArray(String FilePath, String SheetName)
 throws Exception {

 String[][] tabArray = null;

 try {

 int startRow = 1;
 int startCol = 1;
 int totalCols = 0;
 int totalRows = 0;
 int ci, cj;

 FileInputStream ExcelFile = new FileInputStream(FilePath);

 // Access the required test data sheet
 ExcelWBook = WorkbookFactory.create(ExcelFile);
 ExcelWSheet = ExcelWBook.getSheet(SheetName);

 totalRows = ExcelWSheet.getLastRowNum() + 1;
 if (totalRows >= 0) {
 totalCols = ExcelWSheet.getRow(0).getPhysicalNumberOfCells();
 }

 tabArray = new String[totalRows][totalCols];
 ci = 0;

 for (int i = startRow; i <= totalRows; i++, ci++) {

 cj = 0;

 for (int j = startCol; j <= totalCols; j++, cj++) {

 tabArray[ci][cj] = getCellData(i - 1, j - 1);

 System.out.println(tabArray[ci][cj]);

 }

 }
 }

 catch (FileNotFoundException e) {

 System.out.println("Could not read the Excel sheet");

 e.printStackTrace();

 }

 catch (IOException e) {

 System.out.println("Could not read the Excel sheet");

 e.printStackTrace();

 }

 return (tabArray);

 }

 public static String getCellData(int RowNum, int ColNum) throws Exception {

 try {

 Cell = ExcelWSheet.getRow(RowNum).getCell(ColNum);

 int dataType = Cell.getCellType();

 if (dataType == Cell.CELL_TYPE_NUMERIC) {
 return String.valueOf(Cell);

 } else if (dataType == Cell.CELL_TYPE_BLANK) {

 return "";
 } else if (dataType == Cell.CELL_TYPE_STRING) {

 String CellData = Cell.getStringCellValue();

 return CellData;

 }
 } catch (Exception e) {

 System.out.println(e.getMessage());

 throw (e);

 }
 return null;

 }
}
Exporting Sonar reported issues to excel
Recently, I was asked by one of my blog reader to share an approach for exporting issues reported by Sonar to excel. Though the same can be achieved using Sonar plugins having commercial licences & may be few by open source plugins, it is as well possible to fetch the same using the webservice API exposed by the Sonar platform.
More on this webservice java API & javadoc can be found here – http://docs.sonarqube.org/display/SONAR/Using+the+Web+Service+Java+client
I have written a simple java client which makes a webservice call to Sonar platform running in my local machine & then uses Apache POI (http://poi.apache.org/download.html) to generate the corresponding excel.
Here is the java code (Note – The below code snippet is not exhaustive because of the time constraint. Currently, it just try to fetch all the Critical, Major & Minor issues of the projects analysed by Sonar. I’ll try to enhance the same in future!) –
package com.sanjit;

import java.io.FileOutputStream;
import java.util.List;

import org.apache.poi.hssf.usermodel.HSSFRow;
import org.apache.poi.hssf.usermodel.HSSFSheet;
import org.apache.poi.hssf.usermodel.HSSFWorkbook;
import org.sonar.wsclient.SonarClient;
import org.sonar.wsclient.issue.Issue;
import org.sonar.wsclient.issue.IssueClient;
import org.sonar.wsclient.issue.IssueQuery;
import org.sonar.wsclient.issue.Issues;

public class Sample {

public static void main(String args[]) {

String login = "admin";
String password = "admin";

SonarClient client = SonarClient.create("http://localhost:9000");
client.builder().login(login);
client.builder().password(password);

IssueQuery query = IssueQuery.create();
query.severities("CRITICAL", "MAJOR", "MINOR");

IssueClient issueClient = client.issueClient();
Issues issues = issueClient.find(query);
List<Issue> issueList = issues.list();
createExcel(issueList);
}

private static void createExcel(List<Issue> issueList) {
// TODO Auto-generated method stub

try {
String filename = "D:/SonarIssues.xls";

HSSFWorkbook workbook = new HSSFWorkbook();
HSSFSheet sheet = workbook.createSheet("FirstSheet");

HSSFRow rowhead = sheet.createRow((short) 0);
rowhead.createCell(0).setCellValue("Project Key");
rowhead.createCell(1).setCellValue("Component");
rowhead.createCell(2).setCellValue("Line");
rowhead.createCell(3).setCellValue("Rule Key");
rowhead.createCell(4).setCellValue("Severity");
rowhead.createCell(5).setCellValue("Message");

for (int i = 0; i < issueList.size(); i++) {
HSSFRow row = sheet.createRow((short) i+1);
row.createCell(0).setCellValue(issueList.get(i).projectKey());
row.createCell(1).setCellValue(issueList.get(i).componentKey());
row.createCell(2).setCellValue(
String.valueOf(issueList.get(i).line()));
row.createCell(3).setCellValue(issueList.get(i).ruleKey());
row.createCell(3).setCellValue(issueList.get(i).severity());
row.createCell(3).setCellValue(issueList.get(i).message());
}

FileOutputStream fileOut = new FileOutputStream(filename);
workbook.write(fileOut);
fileOut.close();
System.out.println("Your excel file has been generated!");

} catch (Exception ex) {
System.out.println(ex);

}
}
}
You will need to put the below jars in your classpath –
http://central.maven.org/maven2/org/codehaus/sonar/sonar-ws-client/4.3/sonar-ws-client-4.3.jar
http://www.apache.org/dyn/closer.cgi/poi/dev/bin/poi-bin-3.11-beta3-20141111.zip
Websphere Shared Library
Shared libraries are files used by multiple applications. Examples of shared libraries are commonly used frameworks like Apache Struts or log4j. You use shared libraries typically to point to a set of JARs and associate those JARs to an application, a Web module, or the class loader of an application server.
Shared libraries are especially useful when you have different versions of the same framework you want to associate to different applications.
Shared libraries are defined using the administration tools. They consist of a symbolic name, a Java class path, and a native path for loading JNI libraries.
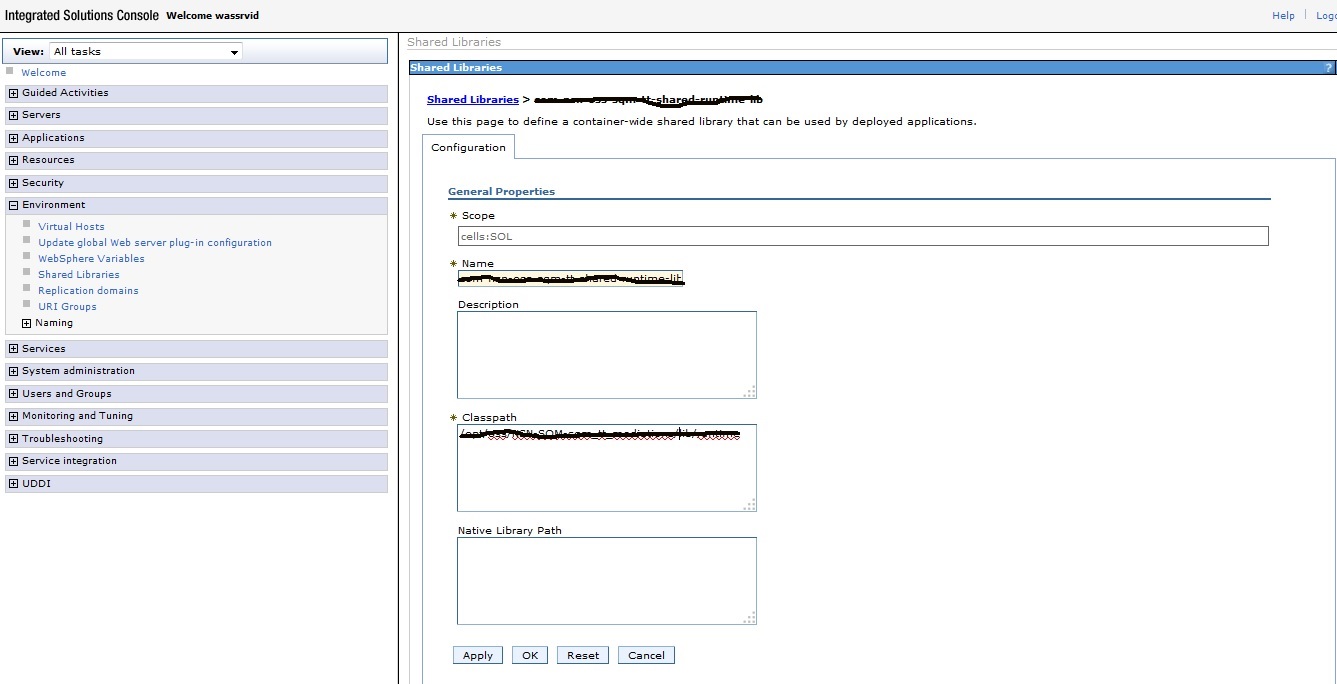
However, simply defining a library does not cause the library to be loaded. You must associate the library to an application, a Web module, or the class loader of an application server for the classes represented by the shared library to be loaded. Associating the library to the class loader of an application server makes the library available to all applications on the server.
Note: If you associate a shared library to an application, do not associate the same library to the class loader of an application server.
You can associate the shared library to an application in one of two ways:
- You can use the administration tools. The library is added using the Shared libraries references link under the References section for the enterprise application.


- You can use the manifest file of the application and the shared library. The shared library contains a manifest file that identifies it as an extension. The dependency to the library is declared in the application’s manifest file by listing the library extension name in an extension list.

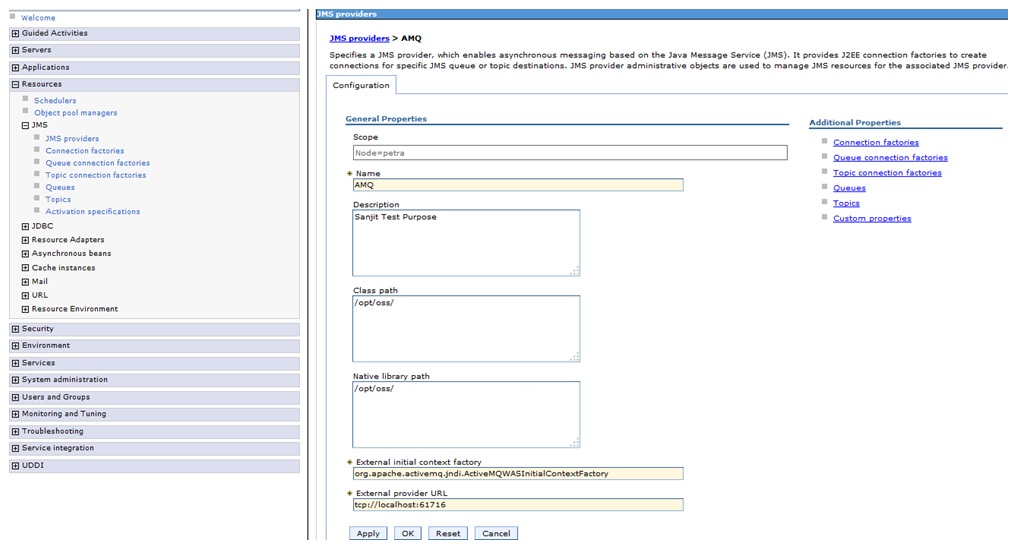
Configuring websphere for external third party non-JCA JMS provider
WAS v6.1 supports the use of third-party JMS providers within its runtime environment through the use of a generic JMS provider. A generic JMS provider must be defined to WAS before any JMS resources can be configured for that provider.
Defining a generic JMS provider to WAS ensures that the JMS provider classes are available on the application server classpath at runtime.
WAS interaction with a generic JMS provider –
The JMS administered objects for a generic JMS provider are bound into the local JNDI name space within WebSphere Application Server. These JNDI entries act as aliases to the real JMS administered objects that have been configured in the external JNDI name space of the messaging provider.

This indirection is achieved by providing additional JNDI information when configuring the JMS administered objects for the generic JMS provider. JMS client application code is not affected in any way. It is the responsibility of the WebSphere runtime to resolve accesses to the real JNDI entries in the external name space.
WebSphere is not responsible for binding the JMS administered objects into the external name space. This administrative task, along with creating the underlying messaging objects, queues, and topics, must be performed using the tools provided by the generic JMS provider.
Configuring a JMS provider for a third party non-JCA messaging provider:
- Start the administrative console.
- In the navigation pane, click Resources > JMS->JMS providers. The existing messaging providers are displayed, including the default messaging provider and the WebSphere MQ messaging provider.
- To define a new third-party non-JCA messaging provider, click New in the content pane. Otherwise, to change the definition of an existing messaging provider, click the name of the provider.
- Specify the following required properties. You can specify other properties, as described in a later step.
Name: The name by which this messaging provider is known for administrative purposes within WebSphere Application Server.
External initial context factory: The Java classname of the initial context factory for the JMS provider.
External provider URL: The JMS provider URL for external JNDI lookups.
5. Optional: Click Apply. This enables you to specify additional properties.
6. Click OK
7. Save the changes to the master configuration.
Configuring a JMS connection factory for a third party non-JCA messaging provider:
- Display the third-party non-JCA messaging provider. In the navigation pane, click Resources > JMS->JMS providers.
- Select the third-party non-JCA messaging provider for which you want to configure a connection factory.
- Optional: Select the Scope setting corresponding to the scope of the connection factories that you want to view or change.
- In the content pane, under Additional Properties, click Connection factories This displays a table listing any existing JMS connection factories, with a summary of their properties.
- To browse or change an existing JMS connection factory, click its name in the list. Otherwise, to create a new connection factory, complete the following steps:
- Click New in the content pane.
- Specify the following required properties. You can specify other properties, as described in a later step.
Name: The name by which this JMS connection factory is known for administrative purposes within IBM® WebSphere® Application Server.
Type: Select whether the connection factory is for JMS queues (QUEUE) or JMS topics (TOPIC).
JNDI Name: The JNDI name that is used to bind the JMS connection factory into the WebSphere Application Server namespace.
External JNDI Name: The JNDI name that is used to bind the JMS connection factory into the namespace of the messaging provider.
C. Click Apply. This defines the JMS connection factory to WebSphere Application Server, and enables you to browse or change additional properties.
6. Click OK.
7. Save any changes to the master configuration.

Configuring a JMS destination for a third party non-JCA messaging provider:
- Start the administrative console.
- In the navigation pane, click Resources > JMS->JMS providers.
- Click the name of the third-party non-JCA messaging provider.
- In the content pane, under Additional Properties, click Queues for point-to-point messaging or Topics for publish/subscribe messaging.This displays a table listing any existing JMS destinations, with a summary of their properties.
- To browse or change an existing JMS destination, click its name in the list. Otherwise, to create a new destination, complete the following steps:
- Click New in the content pane.
- Specify the following required properties. You can specify other properties, as described in a later step.
Name: The name by which this JMS destination is known for administrative purposes within WebSphere Application Server.
Type: Select whether the destination is for JMS queues (QUEUE) or JMS topics (TOPIC).
JNDI Name: The JNDI name that is used to bind the JMS destination into the WebSphere Application Server namespace.
External JNDI Name: The JNDI name that is used to bind the JMS destination into the namespace of the messaging provider.
- Click Apply. This defines the JMS destination to WebSphere Application Server, and enables you to browse or change additional properties.
6. Click OK.
7. Save any changes to the master configuration.

Set custom property for the JMS destination:
Set custom properties of the provider to map external JNDI names. Below is just for illustration & ease of reference purpose:
– java.naming.connectionFactoryNames = ConnectionFactory
– java.naming.queue.MyQueue = MyQueue
– java.naming.topic.MyTopic = MyTopic

Managing message listener resources for message-driven beans:
- Start the administrative console.
- In the navigation pane, click Servers > Server Types > WebSphere application servers->server_name > [Communications] Messaging > Message listener service > [Additional Properties] Listener Ports > listener_port
- Select the name of the listener port that you want to work with. This displays the properties of the listener port in the content pane.
- Click OK.
- Save your changes to the master configuration.
- To have a changed configuration take effect, stop then restart the application server.
Create a Message Listener Port for message-driven beans. Below is just for illustration & ease of reference purpose:
– Set the connection factory JNDI, e.g. “ConnectionFactory”
– Set the destination JNDI, e.g. “MyTopic”


In the MDB project’s “ibm-ejb-jar-bnd.xmi” file, refer to the above message listener as –
<?xml version="1.0" encoding="UTF-8"?>

<ejbbnd:EJBJarBinding xmi:version="2.0" xmlns:xmi="http://www.omg.org/XMI" xmlns:ejb="ejb.xmi" xmlns:ejbbnd="ejbbnd.xmi" xmi:id="EJBJarBinding_1416464607405">

<ejbJar href="META-INF/ejb-jar.xml#ejb-jar_ID"/>

<ejbBindings xmi:type="ejbbnd:MessageDrivenBeanBinding" xmi:id="MessageDrivenBeanBinding_1416464607406" listenerInputPortName="AMQ_JMS_TopicPort">

<enterpriseBean xmi:type="ejb:MessageDriven" href="META-INF/ejb-jar.xml#SampleMDB"/>

</ejbBindings>

</ejbbnd:EJBJarBinding>
